
Reprinted with permission of Insightful Accountant
 You may not even be using a cloud accounting product, or you might be floating on a different cloud then Xero, but our job is to make you aware of all the possibilities out there. So if you are using Xero for your accounting, and you have merchandise you sell that needs to be tracked in terms of item quantities on hand, and/or the value of items on hand, then Xero’s tracked inventory feature maybe for you.
Unlike some other accounting solutions, Xero won’t let you have a negative inventory quantity or balance.
On the other hand, if you sell merchandise before you purchase it, because you only buy-on-demand or manufacture-on-demand, or you have orders fulfilled from a supplier, then Xero’s tracked inventory feature isn’t for you. In these cases, you can choose to use Xero’s untracked inventory capabilities or consider using an inventory add-on solution.
Unlike some other accounting solutions, Xero won’t let you have a negative inventory quantity or balance. One reason for this limitation, which really is a ‘good thing’ in my opinion, is the preservation of the integrity of the ‘average cost method’ Xero uses to track inventory value. Xero uses an average cost method defined as: Item Value = (opening balance value + purchases value – cost of goods sold value) / quantity on hand.
Purchases value includes the cost of items reflected in bills with the status of awaiting payment or paid, and spend money transactions. The cost of goods sold value in the equation reflects invoices with the status awaiting payment and paid, as well as items associated with receive money transactions.
There are some other reasons why Xero’s tracked inventory may not be the right solution for your business. For example, if you have more than 4000 inventory items, you should be looking at a more-robust inventory add-on to Xero. If you manufacture finished goods, you really need a manufacturing add-on to Xero that can not only track inventory but offer you production capabilities. If your accountant wants you to use a different inventory valuation method, other than ‘average cost’ as I described it earlier, then Xero’s inventory isn’t for you.
Preparing to Track Inventory
Prepare to track inventory by insuring the necessary accounts are set-up.
Inventory Asset Account
Xero uses a special account type called ‘Inventory’ to manage tracked inventory. Xero only allows you to select this account type when you create tracked inventory items.
![]() If you used Xero’s default chart of accounts for your business you may already have an account with the Inventory account type. If you don’t already have an account in your chart of accounts with the Inventory account type, you must create one before setting up any tracked inventory items.
If you used Xero’s default chart of accounts for your business you may already have an account with the Inventory account type. If you don’t already have an account in your chart of accounts with the Inventory account type, you must create one before setting up any tracked inventory items.
Cost-of-goods-sold Account
Xero also needs to know the account to be used when tracked inventory items are sold, typically this is referred to as a Cost-of-goods-sold (COGS) account, it doesn’t have to be a specific type of account in Xero, but normally it will be associated with ‘Direct Costs’.
Again, if you set-up Xero using the default chart of accounts, you may already have a COGS account; otherwise, you will need to set one up before configuring tracked inventory items.
Adding Individual Tracked Inventory Items
With your inventory asset and COGS accounts set-up you can now begin adding your tracked inventory items. Simply follow these steps below; however, If you are unsure about setting-up tracked inventory, consult your Certified Xero Partner, accountant or bookkeeper.
Step 1 – Go to Accounts, then Inventory.
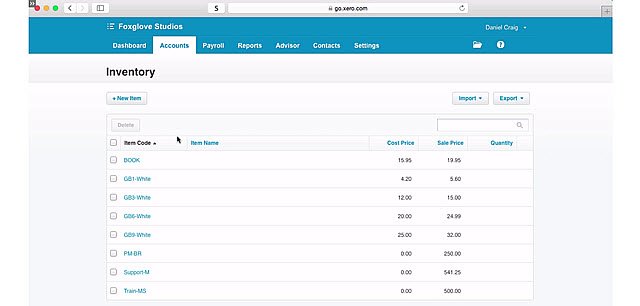
Step 2 – Click the + New Item button.
Step 3 – Enter an Item Code of up to 30 characters.
Be aware that Xero sorts item codes alphanumerically, so if you have items 1, 10, 100, 1000, 100000, they will be listed just that way; consider adding leading zeros to items to keep the list in the order you wish. Another alternative is to use standard referenced codes like an SKU.
Step 4 – Enter an Item Name of up to 50 characters.
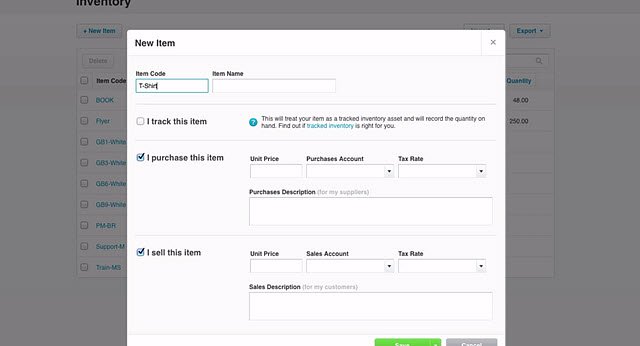
Step 5 – Checkmark the checkbox I track this item.
Step 6 – Select your inventory account under the drop-down field Inventory Asset Account.
Step 7 – Select and enter the appropriate I purchase this item section information, such as purchase price, COGS, and tax rate.
Make certain to select the Cost-of-goods-sold account you configured earlier for your tracked inventory items. Select a default tax rate, or one you’ve set up. For items you sell, you can select the Auto Look Up tax rate to look up tax each time you use the inventory item.
Step 8 – Complete the description fields within both the I purchase this item, and I sell this item, sections of the item window.
Make certain to enter a description that has enough information for your suppliers (I purchase this item), or your customers (I sell this item). The description displays on invoices, quotes and purchase orders for your customers and suppliers.
Step 9 – Select and enter the appropriate I sell this item section information such as unit (sales) price, sales (income) account, and tax rate.
Step 10 – Click the green Save button at the bottom of the window, after you are finished entering your tracked inventory item information.
After you have finished adding a tracked inventory item, you may need to enter opening balances for that item if you already have quantities on hand.
Entering Tracked Inventory Item Opening Balances
If you’ve just added a tracked inventory item and you already have inventory quantities on hand, you’ll need to enter an opening balance before you can use that item on a sales invoice or receive money transaction so that your inventory count doesn’t fall below 0. If you are just setting-up tracked inventory items and intend to make purchases of the item for the first time using Xero, then you really won’t set-up opening balances because the purchases you make will increase your inventory quantities and value of the item when they are received.
Care must be taken when entering opening balances of tracked inventory items in Xero, much more so than with other accounting products. If the opening balances you enter are not correct, and you try to adjust them later to correct levels, you might experience negative inventory balances which will result in an error within Xero. So, if you are unsure about entering your opening balances, you consult with your Certified Xero Partner, accountant or bookkeeper.
Use the inventory adjustment feature to enter opening balances when you only have one (or a few) new tracked inventory items.
Xero offers two methods to enter opening balances for tracked inventory items. The first makes use of an import process which is separate and apart from the process of importing tracked inventory items. Insightful Accountant will be covering both the process of importing tracked inventory items and importing opening balances for tracked inventory items in another feature at a future date.
Today, we want to cover the 2nd method for entering opening balances for tracked inventory items, which is the same process used to enter an inventory adjustment. This method works well when only needing to enter opening balances for a few inventory items, as opposed to the import method that permits you to update quantities and value for up to 4000 tracked inventory items.
o update the opening balance of a tracked inventory item, follow these steps:
Step 1 – Go to Accounts, then select Inventory.
Step 2 – Click on the line to open the tracked inventory item you want to adjust.
Step 3 – Click Options, then New adjustment.
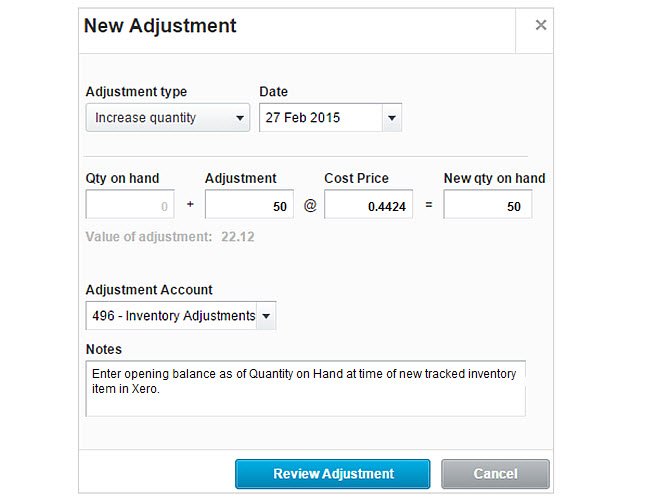
Step 4 – Select the Date for the adjustment.
Step 5 – Enter a quantity in either the Adjustment or New qty on hand field.
Do NOT change the Cost Price field. If you need to adjust this value you will want to make a revaluation adjustment.
Step 6 – Select an Adjustment Account from the drop-down of accounts.
You will need to select the appropriate account from your chart of accounts, if necessary you can create an adjustment account. If you are unsure about the appropriate adjustment account to use when entering your opening balance(s), consult your Certified Xero Partner, accountant or bookkeeper.
Step 7 – Enter a reason for the adjustment, such as ‘enter opening balance’, within the Notes field.
Step 8 – Click the blue Review Adjustment button.
Step 9 – Verify that the details of your Inventory Adjustment are correct.
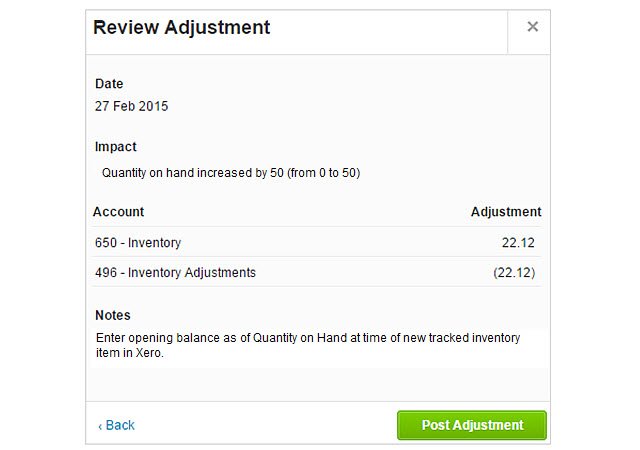
Step 10 – Click the green Post Adjustment button to finalize your quantity adjustment.
Xero makes tracking inventory items easy. For more information about Xero see their website, or visit their help center here for details specific about Xero inventory functionalities.
William (Bill) Murphy, better know as “Murph”, is Senior Editor at Insightful Accountant, in charge of all things related to content. Murph is an Advanced Certified QuickBooks ProAdvisor with over 20 years of consulting experience; he is the “anchor” of the National Advisor Network’s online forum and is a three time consecutive winner of the NAN Online MVP award. Murph has published articles in numerous industry publications and blogs and served as Technical Editor for Business Analysis with QuickBooks by Wiley Publishing.
Insightful Accountant is an independent news and information source written specifically for the small business advisor who needs to stay current on the latest news and offerings in accounting technology, including updates from Intuit, Xero, Sage and the hundreds of Add On products serving the small business.